تطبيقات، مغناطيس المطبخ
الرف المغناطيسي
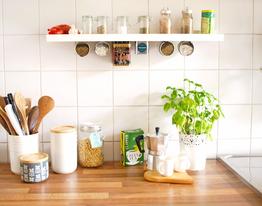
لقد قمت ببناء رف التوابل DIY الخاص بي والذي يمكنك تثبيته تحت التوابل. لقد قمت بتعديل رف صغير من HEMA ومغناطيس مدمج في لوحة الرف. إلى جانب حاويات التوابل ، يمكنك أيضًا تعليق الأشياء المعدنية الأخرى. يمكنك أيضًا تعليق الأشياء غير المغناطيسية إذا قمت بلصق المغناطيس مباشرة أسفل الغطاء.
للرف الذي تحتاجه:
- لوحة الرف (هنا: هيما, 8 يورو)
- آلة الحفر
- قاطعة الثقب 21-22 مم
- مغناطيس القرص 20 س 5 مم
- الطين النمذجة
- حاويات معدنية
- قلم رصاص
- اثنين من البراغي
- مفك البراغي
-
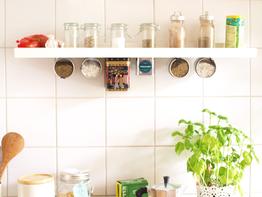
وهذه هي الطريقة التي تفعل بها ذلك:
- فكر في عدد المغناطيسات التي تريد تضمينها في الحامل وحدد أماكن الثقوب.
- قم بحفر الثقوب بعناية باستخدام قاطعة الثقب وتأكد من عدم الحفر عبر الحامل.
- ضع المغناطيس (التوجه الصحيح) في الثقوب وملءها بالطين.
- قم بتعليق الرف وإرفاق الحاويات المعدنية. يمكنك لصق المغناطيس في حاويات غير مغناطيسية.
مدونتي للفنون والحرف اليدوية
يمكنك العثور على هذه الأفكار والعديد من الأفكار الأخرى مدونة myarts والحرف اليدوية!